3. PRMFA Setup (Phish resistant multi factor authentication)
To complete the PRMFA process, new hire will need one of the following supported device options.
- Windows 11 PC with Windows Hello enabled.
- A macOS 14 or higher device with Platform SSO enabled.
- An iOS 17 or higher device.
- An Android 14 or higher device.
- A hardware security key (YubiKey) issued by Microsoft.
IMPORTANT:
- If the new hire does not have access to any of the supported devices mentioned above, they need to contact their manager and ask them to raise a ticket at https://aka.ms/TechWeb for guidance, and/or request a security key on their employee's behalf via the Security Key Request Portal.
- Setting up the Microsoft Authenticator app requires registering your device with Microsoft, but it does not require you to allow any Microsoft management of your device. If you decide not to register your device with Microsoft, skip this section and follow the Set up YubiKey steps below.
- Password and one (Windows Hello pin or Mac Platform SSO registration or Passkey or YubiKey) of the PRMFA setup should be completed before TAP expires.
If you encounter any issues, your manager can give you the Helpdesk contacts. Please reach out to them for assistance.
Add Passkey on Windows Hello
Please ensure you meet these requirements before setting up your passkey.
- Windows 11 22H2 or later.
- Windows Hello must be enabled on Windows devices meant to store passkeys.
Note: macOS devices cannot be used with these instructions.
Step 1: Check if you already have a passkey.
In your Corporate device or the local computer where AVD (Azure Virtual Desktop) is running verify that you already have a passkey for your Microsoft account. Go to Windows>Settings > Accounts > Passkeys, if you already have a passkey then you are all set!
If no passkey is displayed, follow the steps below to create a passkey on your device.
Step 2: Sign-in to aka.ms/MySignins from an Edge browser, and add a sign-in method.
Note: If you intend to set up a passkey on a non-Microsoft-managed device, you must access MySignins in a remote AVD session using a supported Remote Desktop app as per Prerequisites section, using your microsoft.com account.
Step 3: From "Security info", select "Add a sign-in method", then "Security key or passkey".
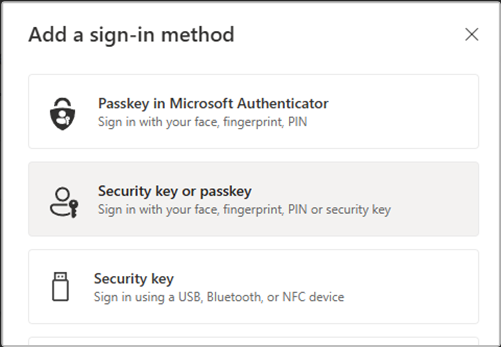 Add a sign-in method
Step 4: At, "Add a passkey for more secure sign-in", select Next.
 Add a passkey for more secure sign-in
Step 5: To add a passkey, select Next and when prompted, enter your login PIN to save the passkey to your device.
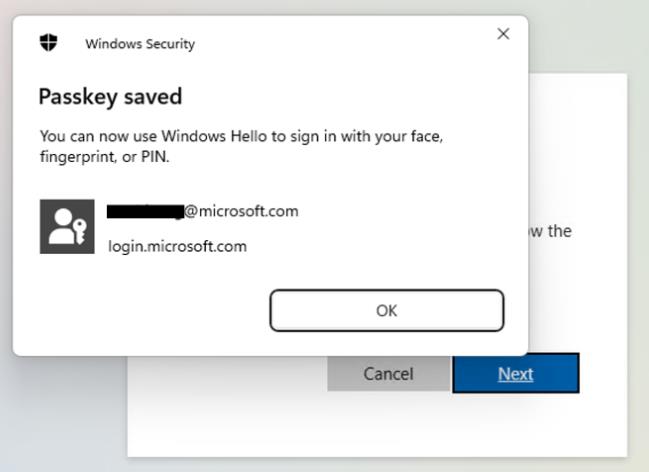 Saving Passkey in the device
Step 6: Name your new passkey, before click on Done.
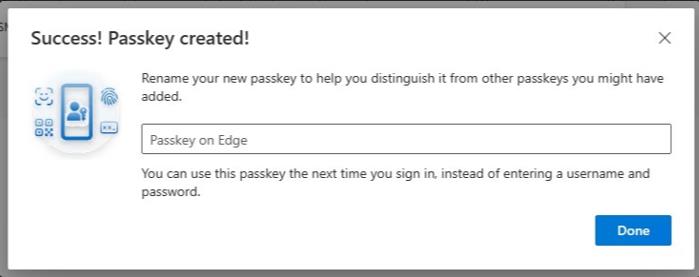 Name your passkey before click on Done
Important: this step must be completed to finish the setup process. Otherwise, you will have to delete the passkey you just saved on your device and try again.
Step 7: Confirm that you see the newly created passkey on Windows > Settings > Accounts > Passkeys.
Add PRMFA Passkey to macOS device
Set up Platform Single Sign-On (recommended)
Platform Single Sign-On (PSSO) is the preferred PRMFA method for macOS devices.
To set up PSSO:
Step 1: Go to Users and Groups > Network Account Server > Edit. Then select Register on Mac SSO Extension to register your macOS account with Microsoft.
Or, if the Registration Required prompt is displayed, select Register. 
Step 2: Touch ID or enter your password to register your device with Microsoft Entra. 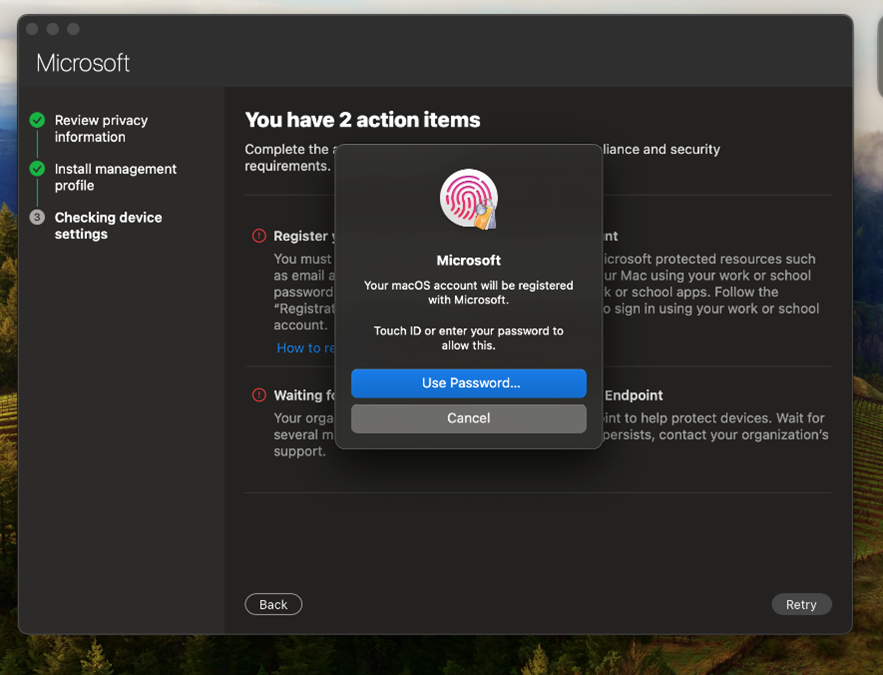
Step 3: Select your account to sign in. 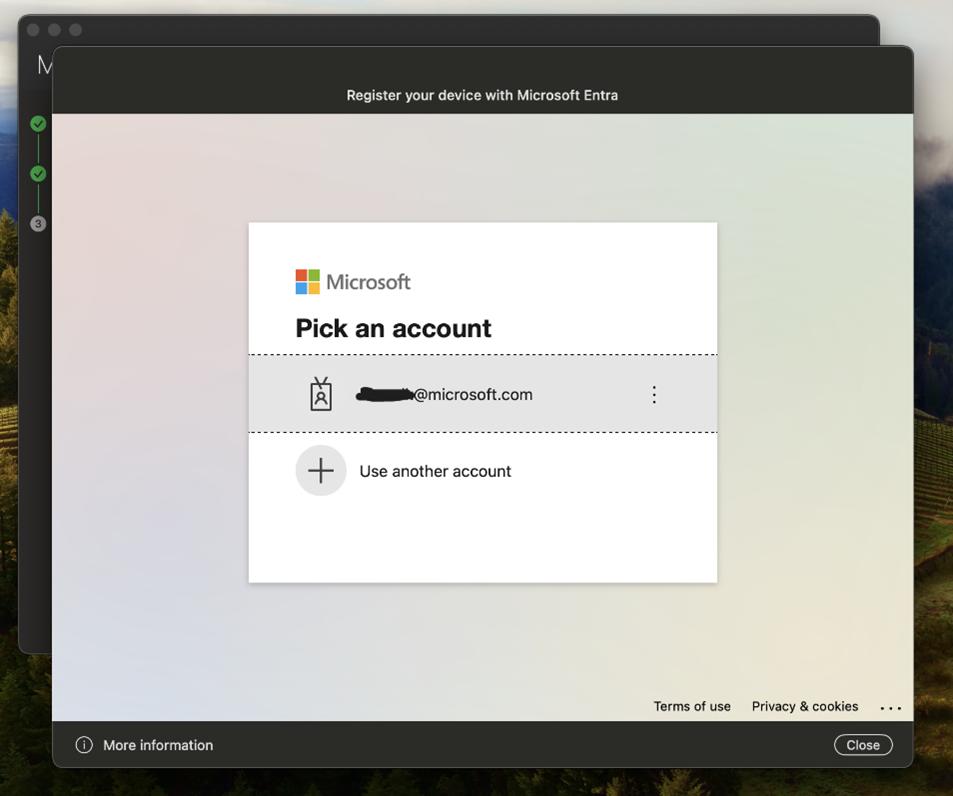
Step 4: Select iPhone, iPad, or Android device, then select Continue. 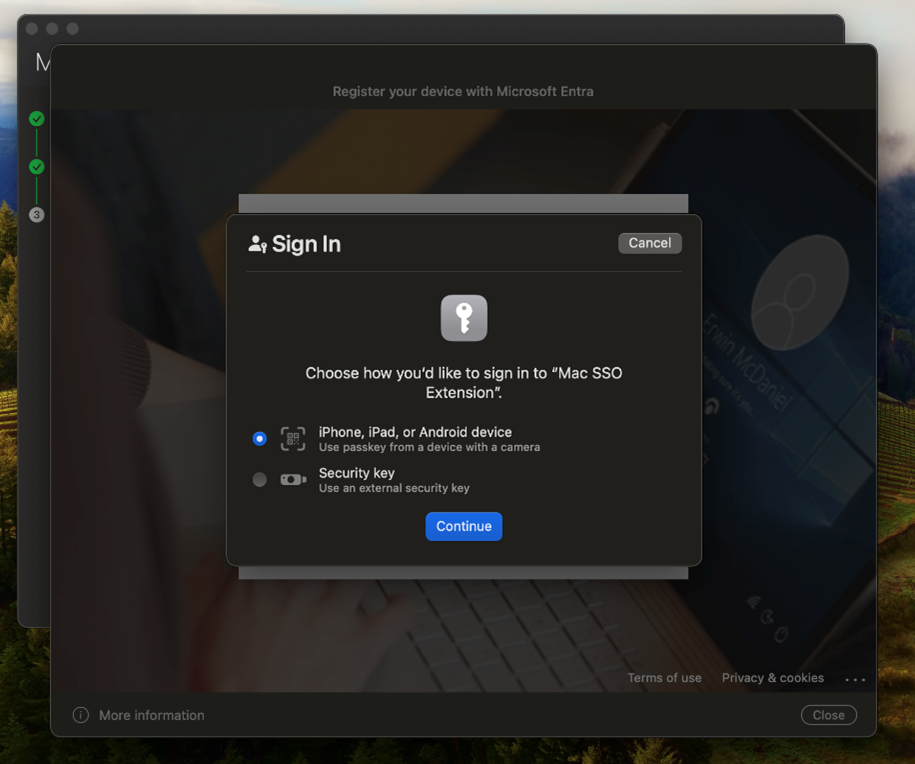
Step 5: Scan the QR code with your iPhone’s camera app or your Android’s Authenticator app to complete authentication. 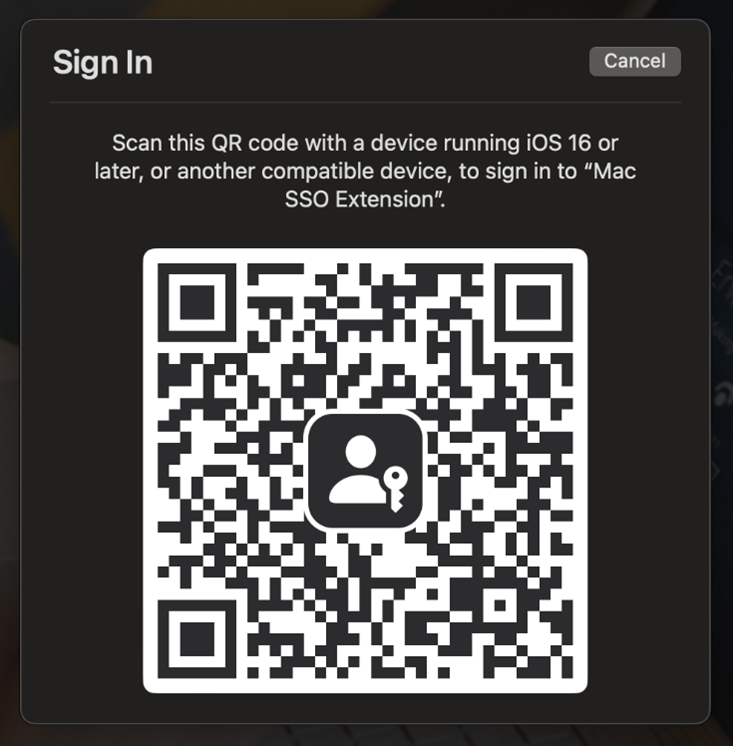
Step 6: Go to Settings > General > Autofill & Password and select Company Portal to enable your Entra ID passkey.
For macOS 14, go to Settings > Passwords > Password options > Autofill from and select Company Portal to enable your Entra ID passkey. 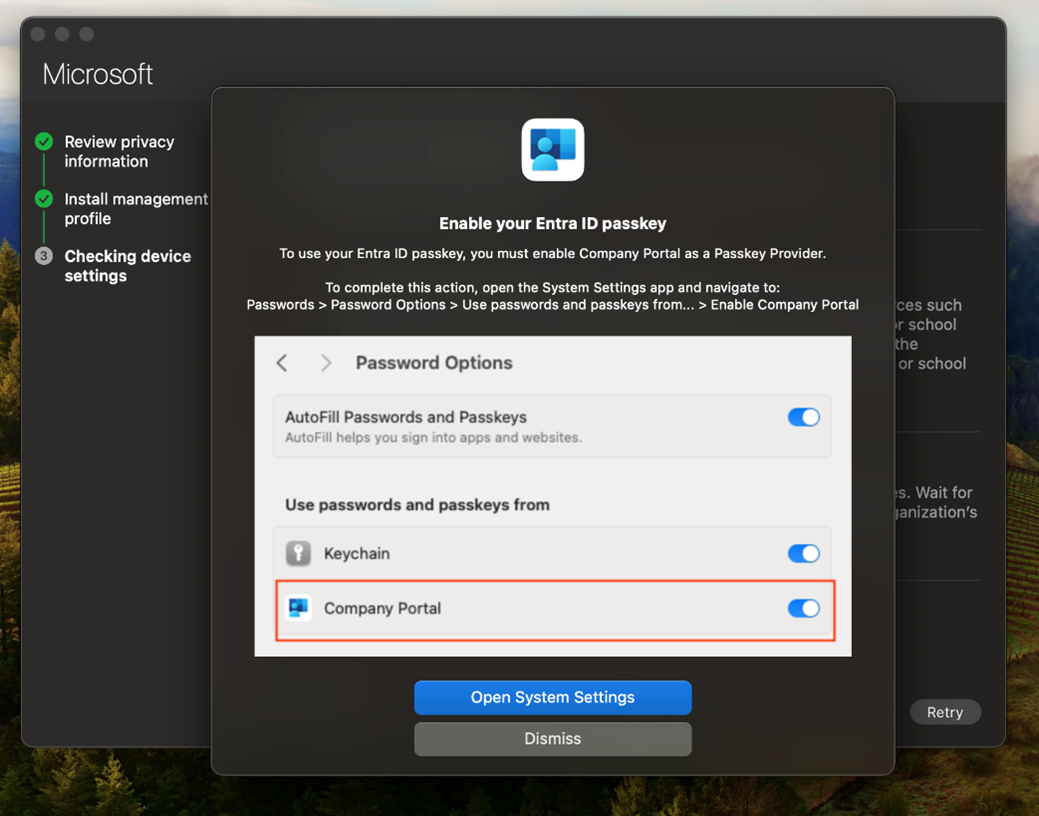
Step 7: Your Entra ID passkey has been successfully setup, so you can use this method to login to your work device or corporate resources. 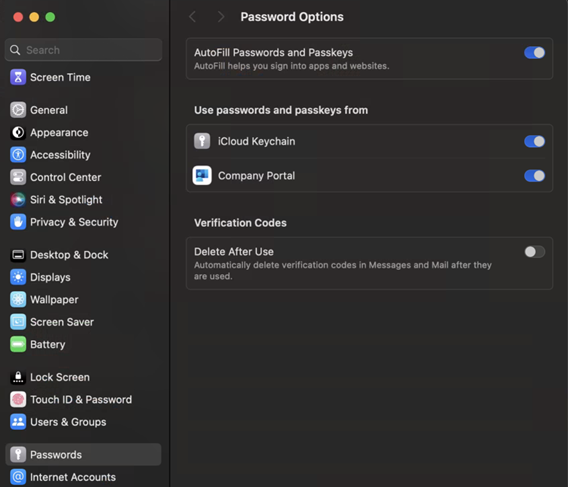
If PSSO is not available
If PSSO is not an option for you at this time, follow the steps above to add a passkey to your mobile device (IOS/Android) or to set up a YubiKey. These options can help you sign in to Microsoft resources on your MacOS device.
Add PRMFA Passkey to IOS device
IMPORTANT NOTE: Currently, iOS 17 only supports one passkey app. Therefore, you will need to either update your device to iOS 18 or disable/uninstall any password manager apps that also support passkeys.
Step 1: Download Authenticator from the App Store, open it, and go through the privacy screens.
Step 2: Add your account in Authenticator on your iOS device. Tap Add account or the + button.
Note: If you already have an account in the Authenticator, tap your account in the app, and then tap the settings gear near the upper right of the account details page. Tap Create a passkey (Preview) and skip directly to the sign-in step of the flow.
Step 3: You need to complete multifactor authentication (MFA).
Step 4: Select Work or school accounts.
Step 5: Select "sign in".
Step 6: When prompted to allow Authenticator to use Touch ID/Face ID, tap Allow.
Step 7: When prompted to allow Authenticator to send you notifications, tap Allow.
Step 8: Select Open Settings to enable Authenticator as a passkey provider.
Step 9: Enable the Authenticator as a passkey provider.
- On iOS 18, navigate to Settings > General > Autofill & Passwords.
- On iOS 17, navigate to Settings > Passwords > Password Options.
On both operating systems, make sure AutoFill Passwords and Passkeys is turned on. Under Autofill From, make sure Authenticator is selected.
Step 10: Navigate back to the Authenticator app and continue. Authenticator sets up passkey, password less, and MFA for sign in according to your work or school account policies.
Step 11: After you see passkey added as a sign-in method for your account, tap Continue and you can now see the new account you added.
Add PRMFA Passkey to Android device.
Step 1: Download the Authenticator App from the Play Store and review the privacy screens.
Step 2: Tap Add account or the "+" button to add your work or school account.
Note: If you already have an account in the Authenticator, tap your account in the app, and then tap the settings gear near the upper right of the account details page. Tap Create a passkey (Preview) and skip directly to the sign-in step of the flow.
Step 3: Select Work or school account.
Step 4: Tap Sign In and enter your Temporary Access Pass (TAP).
Step 5: When the device registration screen appears, choose "skip" if you don’t want to register, or "continue" to register your device with Microsoft.
Note: Passkey can be enabled even if the device is not registered with Microsoft, and opting out of device registration won’t affect passkey registration.
Step 6: Go to Settings and enable Passwords, passkeys, and autofill in the Authenticator app.
Step 7: Enable Authenticator as your passkey provider.
Step 8: Navigate back to the Authenticator app. Authenticator sets up passkey, password less, and MFA for sign in according to your work or school account policies.
This should have you fully set up with Authenticator for passkey use on your Android device!
Set up YubiKey
If you have a Microsoft distributed YubiKey, follow the steps below.
Note: If you need a YubiKey, and are near Redmond WA, you can pick one up at the Tech Support desk in Cafe 34 (9AM-5PM Mon-Fri). If you're outside the Redmond area, your manager can submit a request at Security Key Request Portal (requires corporate authentication).
Step 1: On your Microsoft managed work or mobile device, go to aka.ms/mysecurityinfo in your browser.
If you do not have a Microsoft managed work or mobile device:
- Install theAzure Virtual Desktop Client on your Windows 11 PC.
- Open the Microsoft Remote Desktop app.
- Sign in with your corporate email address (alias@microsoft.com) and your Temporary Access Pass (TAP) which you received through Identity Pass.
- Select the My Signins icon under Manage my credentials.
Step 2: Select + Add Sign-in Method.
Step 3: Select Choose a method > Security Key.
Step 4: Select Next > USB Device.
Step 5: Select Next once you are ready to proceed.
Step 6: Follow the onscreen instructions to complete the setup of your YubiKey.
Step 7: You should see You're all set! message, select Done.
Step 8: Finally, you will see a security key in the list of sign-in methods.
Step 9: Verify that you can login to outlook.com/microsoft.com with your YubiKey.


 1.
1.