


 1.
1.
3. Computer Setup and/or Virtual Desktop Setup
Contingent Staff - Aliases starting with (V-), (A-) or (B-):
- New users - Select the Microsoft Virtual Desktop tab to get started. Do not choose the Windows or Mac options unless you have been granted an MVD exception.
- Existing users with an approved MVD exception - You may continue, using the Windows or Mac options listed below. If you’re unsure whether you have an approved MVD exception, please check with your manager before proceeding.
Note: If the device was previously used and not reimaged, the Is this the right country or region? screen will not appear when the device is powered on. First, you will need to wipe and reimage the device. Follow the appropriate recovery guide based on the manufacturer:
Set up your new Windows 11 device
After you complete the steps on the Account Setup and PRMFA Setup pages, follow these instructions to complete your setup.
The OEM image includes Windows 11 and Microsoft 365 Apps (formerly Office 365 Pro Plus).
Important: An internet connection is required to complete the setup of your new Windows 11 device. The process will take about 20-45 minutes.
If you are setting up a BYOD/personal Windows device, please note the following limitations:
- Your BYOD/personal device must be running Windows 11 Pro or Enterprise. Home edition is not supported.
- Windows OS Workplace Join (WPJ) is no longer supported in the production environment. Devices must be enrolled in Microsoft Entra ID.
Device setup
Step 1: Before you begin, ensure your device is connected to a power supply and is connected to the internet. Then turn on your device.
Step 2: Select the country or region for your device and then select Yes.

Step 3: Select your preferred keyboard layout or input method and select Yes.

Step 4: If you want to add a second keyboard layout select Add layout. Otherwise, select Skip to continue.

Step 5: If Prompted Let's connect you to a network,choose your preferred network and select connect.If you are setting up your device in a Microsoft building,select MSFTGUEST.For additional details,Visit https://aka.ms/MSFTGUESTnetwork
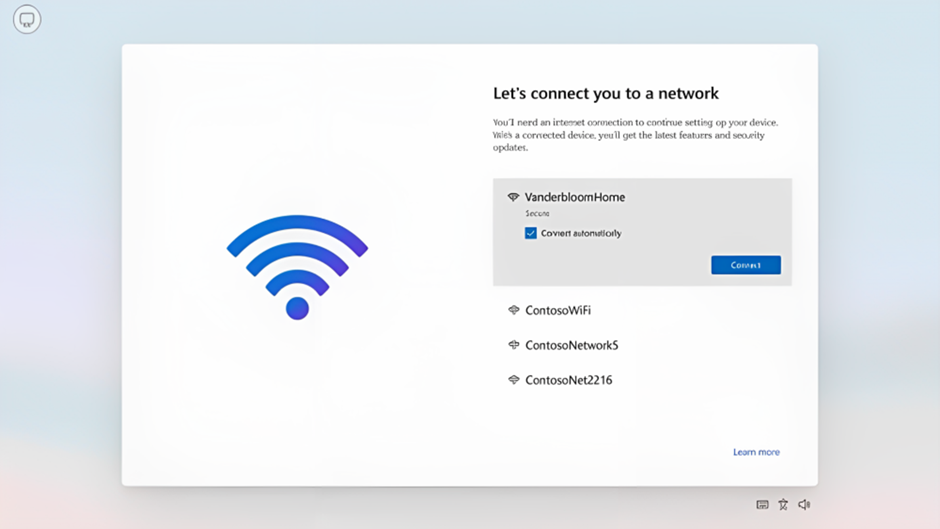
Note: If you are unable to connect to the MSFTGUEST network, we recommend connecting via wired ethernet cable or personal Wi-Fi network with internet access to complete setup. Once setup is complete and policies are applied, you can connect to the MSFTCONNECT wireless network (https://aka.ms/MSFTCONNECTwireless).
Step 6: When connected to the internet, your device will check for updates. Your device may restart during this time.

Step 7: Next you may see the Let’s set things up for your work or school. If you are prompted on how to set up your device, select Set up for work or school and select Next.

Step 8: Enter your Microsoft corporate email address (alias@microsoft.com) and select Next.
 and select Next")
Step 9: If you are a new employee, enter your temporary access pass (TAP) and then select Sign in. If you are an existing employee setting up a new device, skip to step 10.
 and then select Sign in. If you are an existing employee setting up a new device, you can skip to step 11")
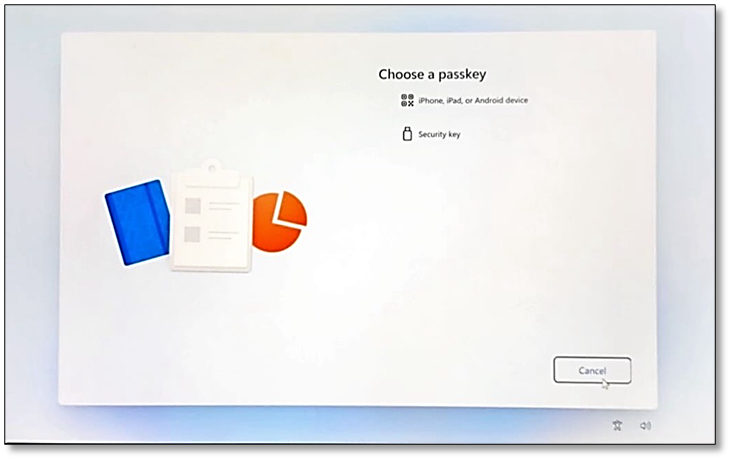
Step 10: On the Choose a passkey screen select either iPhone, iPad, or Android device if using your mobile passkey or Security key if using a YubiKey. Then continue to the relevant Sign in with a passkey step to complete your sign in.
Note: If the Approve sign in screen is shown and you're prompted to Open your Authenticator App and enter the number shown to sign in, instead select Sign in another way. Next, select Face, fingerprint, then PIN or security key and then select either iPhone, iPad, or Android device or Security key and then follow the instructions to complete authentication.
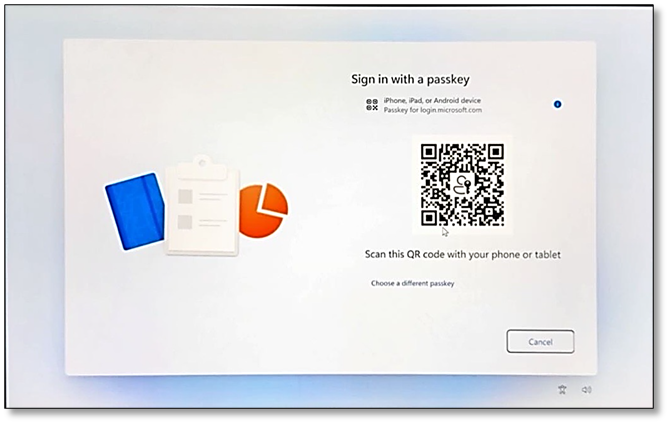
A. If you have a passkey on your mobile device, on the Sign in with a passkey screen, scan the QR code with your phone or tablet and then follow the instructions to complete authentication.
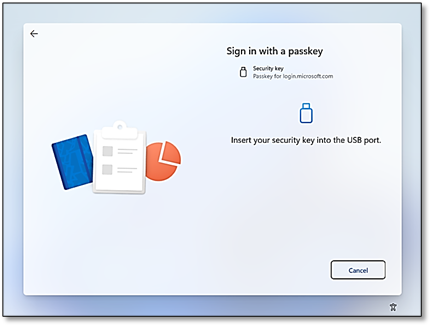
B. If you have a Security key, on the Sign in with a passkey screen, insert your security key into the USB port or Touch your security key and follow the instructions to complete authentication.

Note: If you are asked to insert a Security Key and prefer to use your passkey on your mobile device, select Cancel. Next, choose Sign in another way, then Face, fingerprint, then PIN or security key, and Sign in with your passkey. Finally, on Choose a passkey screen select iPhone, iPad, or Android device and follow the instructions to complete authentication.
Step 11: Wait for Device preparation, Device setup, and Account setup to complete. Your device may restart.

Step 12: Once your device is setup for work, if available, the latest quality updates will be downloaded and installed.


Step 13: Next you will see a prompt to configure Windows Hello, which is a required security component. Select Yes, set up to configure now. If your device does not have either a Windows Hello supported camera or a fingerprint scanner, select Skip for now. Skip to step 14 of this document.


Step 14: You will be prompted to create a PIN. Select Next.


Step 15: Well done! Your device is now set up and you can sign into Windows 11 with your corporate credentials.
Step 16: In the Windows search box, type Check for updates and then select the first result. Install any recommended updates and restart your device if needed.
After successfully installing all updates, you are now ready to access internal resources. To learn more about those resources, and make your first few days more productive, visit the New Joiner Site Page.
Need to be productive while on the go? Then set up your mobile phone to access your work emails or join meetings! Visit our Mobile device setup guide to learn how.


Set up Microsoft Virtual Desktop
If you don't have a dedicated Microsoft device, you can still access Microsoft resources from any device using Microsoft Virtual Desktop (MVD).
Using the MVD client
Step 1: Install the Windows App for your OS:
Step 2: Open the Windows app.
Step 3: Sign in with your Microsoft corporate user credential and Multi-Factor Authentication you setup in the earlier steps.

Step 4: Select the Desktop icon in the region that's geographically closest to you. Cloud regions are preferred.


Using MVD on the web
Step 1: Open the Microsoft Remote Desktop web version.
Step 2: Signing-in is required to see the Desktops page, and sign-in is not required when accessing a Desktop.
Sign in using your Microsoft corporate email account (alias@microsoft.com) with your PRMFA setup.
Step 3: Select the Desktop icon in the region that's geographically closest to you.

You are now ready to access internal resources. To learn more about those resources, and make your first few days more productive, visit the New Joiner Site Page.
Need to be productive while on the go? Then set up your mobile phone to access your work emails or join meetings! Visit our Mobile device setup guide to learn how.
Important: When adding an Apple Account (formerly Apple ID) to your Mac, note the following:
- Use a personal email (i.e., Outlook or Gmail) to create a new Apple Account for managing personal content. Go here for guidance on how to create a new Apple account. Note: Personal devices can still access corporate resources by following the "Set up a non-ABM Mac" instructions.
- To use @microsoft for creating a new Apple Account, you cannot set up a new account using @microsoft email from your device.Apple Accounts using @microsoft are used for work. Microsoft has access to the data within the account.
- To learn more about Apple Accounts, visit aka.ms/AppleAccounts from a managed device.
Set up your corporate-owned Mac device
If you were issued a new corporate-owned Mac device, it will arrive connected to the Microsoft corporate tenant through Apple Business Manager (ABM). ABM support is available for new devices purchased in the US, Canada, EMEA, and more locales.
Turn on your ABM-connected device for the first time and follow these steps:
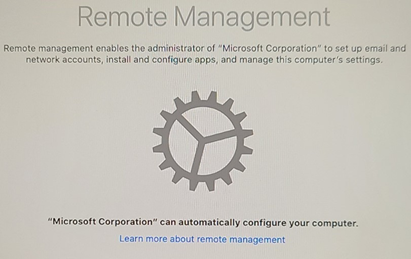
Step 1: The first time you turn on your device, the Remote Management page appears:
Step 2: Sign in with your Microsoft credentials and complete multifactor authentication (MFA).
Step 3: The Migration Assistant page is not included in the out-of-the-box experience but is available after setup is complete. If you're using Migration Assistant to transfer settings from another Mac, clear the System & Network checkbox. Leaving this checked will result in corruption that will require you to reset your device.
Step 4: During setup, you'll be prompted to sign in with your Apple Account or create one. You'll then be asked to create a local computer account. This is different from your Microsoft account and you should not use the same password. Review top of page for information about adding Apple Accounts to your Mac.
Step 5: During setup, you'll also be prompted to use FileVault Disk Encryption; select Turn on FileVault disk encryption. This is required. If you don't enable FileVault at this point, it will be enforced after you complete Company Portal enrollment.
Important: After the out-of-the-box experience is complete, ensure your device is upgraded to the latest version of macOS before proceeding.
Step 6: After upgrading to the latest version of macOS, open the Company Portal app from Launchpad to complete your enrollment.
Step 7: Select Sign in and enter your Microsoft credentials.
Step 8: During enrollment, you may be prompted for the local computer account and then find your password is not accepted. This is a bug we've filed with Apple. To resolve this, restart your Mac. When you log in with your local computer account password, you'll be prompted to change the password. At this point, you can set it to match your Microsoft account password.
Step 9: Review the Software License Agreement and installation details for the Company Portal app. After your device completes the enrollment process, it should receive the corporate wireless certificate within 20 minutes.
Step 10: Along with Company Portal, Microsoft Defender for Endpoint (MDE) and Microsoft Edge are automatically installed during setup.
Step 11: If you did not need to restart and change your password at step 8, do so now before proceeding. Then follow the steps in the PRMFA Setup section to Add PRMFA Passkey to Mac device.
Note: There is a known issue on newly enrolled macOS devices where Company Portal shows the device as non-compliant and reports that user needs to install MDE when it's already installed. This issue should resolve within 48 hours and requires no action on your part. It should not affect your ability to access company resources.
Set up a non-ABM Mac
If you were issued a Mac device that does not show the Remote Management page when turned on for the first time, the device does not support ABM. In these cases, follow these steps:
Step 1: Make sure your device is connected to the internet. If you're at a Microsoft worksite, connect to MSFTGUEST.
Step 2: Complete the normal out-of-the-box experience. Ensure your device is upgraded to the latest version of macOS before proceeding.
Step 3: Download the Company Portal app by visiting Enroll My Mac. From your Downloads, run the Company Portal installer package and follow the steps to begin installation.
Step 4: You'll be prompted for your local account credentials. Enter the password and select Install Software.
During this step, some devices may hit a password failure despite typing in the correct password. This is a bug we've filed with Apple. To resolve this, restart your Mac. When you log in with your local computer account password, you'll be prompted to change the password.
Step 5: Wait for Company Portal to finish installing and then open the Company Portal app.
Step 6: Sign in with your Microsoft credentials and complete multifactor authentication (MFA).
Step 7: Follow the steps to register your Mac device with Intune.
Step 8: Install the management profile by selecting Download profile. In the confirmation window, select Install.
Step 9: Another confirmation window opens, which shares the information that the administrator might collect from your device. Review the details and then select Install to continue. You’ll be prompted to provide your local admin password again.
Step 10: After enrollment is complete, your Mac will appear in the Company Portal.
Step 11: Reboot your Mac. When logging in, you'll be prompted to change your local computer account password.
Step 12: Microsoft Defender for Endpoint (MDE) and Microsoft Edge are automatically installed during setup.
Step 13: FileVault disk encryption is required for connecting to Microsoft resources. If you don't have FileVault enabled on your Mac, it will be enforced after you complete Company Portal enrollment.
Note: There is a known issue on newly enrolled macOS devices where Company Portal shows the device as non-compliant and reports that user needs to install MDE when it's already installed. This issue should resolve within 48 hours and requires no action on your part. It should not affect your ability to access company resources.
You are now ready to access internal resources. To learn more about those resources, and make your first few days more productive, visit the New Joiner Site Page.
Need to be productive while on the go? Then set up your mobile phone to access your work emails or join meetings! Visit our Mobile device setup guide to learn how.