1. Identity Pass Request
Android users from China, Click here to set up your accountPre-requisite for a smoother onboarding
- Have a valid government-issued photo ID ready (e.g., Passport, Driver's License or any other government-issued legal photo ID).
- Please inform your reviewer to be available for approving your request to prevent delays due to time zone differences between you and the reviewer.
- Please note, in case your manager is unavailable (e.g., out of office) and hasn't set up a delegate to review your request, your skip manager can now view and take action on your request directly in the Identity Pass web UI "pending request".
- Ensure you have your work email and Employee ID ready. You should eventually get them from your manager.
- Ensure your hardware (laptop/mobile) can adopt the process below.
- Do not delete the Identity Pass app after receiving the TAP code. You may need the app to regenerate the TAP code if you encounter any blockers during the onboarding process.
- For employees in China, please use the button at the top of the page named "Setup your account (China Android Scenario)".
- Before starting the process, read through the instructions for 'Identity Pass','Password Setup' and 'MFA setup' page to avoid any mid-onboarding blockers.
Important Note: After you enter your employee ID and alias in the identity pass app, and it prompts you to verify your government ID, please use the tab below labeled "identity pass – Legal Id verification" for onboarding instruction.
Obtain your initial Login using Identity Pass
The Identity Pass application helps to verify a user’s identity before granting them temporary access to corporate resources.
Check out the Identity Pass video tutorial:
Step 1: Download the Identity Pass application by using the QR code below on your mobile device.

Step 2: You can also access the application from your mobile browser ataka.ms/KnockKnock.
Step 3: Launch the Identity Pass application by clicking on the icon downloaded on your mobile device.
Step 4: Allow Identity Pass to access your camera, location, microphone, and notifications.
Note: For Android, users must select 'Precise' location to submit a request. If user selects 'Approximate' location, you will be prompted to grant permissions again until 'Precise' location is selected.
If the above-mentioned options are not allowed, you will not be able to successfully complete the process.
If you miss the pop-up, you can always go back to Settings and manually enable Precise Location for the Identity Pass app.
Step 5: Review and Accept Terms & Conditions.
Step 6: Enter your personal email if you do not have access to your corporate email to receive process notifications. This is optional, and you can skip this step if you have access to your corporate email on this device.
Step 7: Enter your UPN Microsoft corporate email address, alias@microsoft.com and employee ID (provided by your manager), then select "Get TAP".
Step 8: Prepare for the liveness detection prompt and follow the instructions provided. Make sure you are in a well-lit room and remove any obstructions from your face (e.g., masks or sunglasses).
Note: If you receive an error message like this: 'Request denied. Your identity cannot be verified. Reach out to your Microsoft contact to have your badge picture updated'.
→ Reach out to your manager/reviewer to resolve this issue.
Step 9: Wait for the incoming video call from your reviewer. They have up to 24 hours to initiate the video call with you. This may happen shortly after you submit depending on the reviewer's availability. You will receive a push notification on your phone (please ensure that push notifications are allowed in the Identity Pass application settings), a Microsoft Team notification, and an email notification to join the call with an approver.
Step 10: Select the link in one of the above-mentioned notifications to Join the video call with the reviewer. To successfully complete the verification process, you must stay on the video call with your manager for at least 15 seconds and answer the reviewer's identity verification questions. Once the call is complete, wait for the reviewer's decision.
Step 11: When your request is verified, you will receive a notification to retrieve a Temporary Access Pass (TAP) in the Identity Pass app. This TAP is only valid for 30 minutes.
Important Note:
- After successful verification and approval, you'll receive a Verified ID in the Identity Pass app to streamline future requests. If you don't complete onboarding within 30 minutes or lose access within 30 days, you can easily request a new Temporary Access Pass (TAP) by completing liveness detection, skipping the need for another video call if the previous verification was completed within that 30-day timeframe.
Step 12: Use the TAP code to set up your MFA in the Authenticator app by clicking "Set up my passkey" and follow the instruction in "PRMFA Setup".
Steps for Existing Users with a Verified ID
Follow the instructions above from Step 1 to Step 8. Note that existing users with a Verified ID do not need a video call with their manager to receive the TAP. A new TAP will be generated by following Steps 1 through Step 8.
Obtain your initial Login using Identity Pass
The Identity Pass application helps to verify a user's identity before granting them temporary access to corporate resources.
Step-by-Step Process
Step 1: Download the Identity Pass application using the QR code or visit https://aka.ms/KnockKnock

Step 2: Launch the Identity Pass application by clicking on the icon downloaded on your mobile device.
Step 3: Allow Identity Pass to access your camera, location, microphone, and notifications.
Note: For Android, users must select 'Precise' location to submit a request. If user selects 'Approximate' location, you will be prompted to grant permissions again until 'Precise' location is selected.
If the above-mentioned options are not allowed, you will not be able to successfully complete the process.
If you miss the pop-up, you can always go back to Settings and manually enable Precise Location for the Identity Pass app.
Step 4: Review and Accept Terms & Conditions.

Step 5: Enter your personal email, Microsoft corporate email (UPN), and Employee ID.

Step 6: Click 'No' to receive a verified ID on your Authenticator app. Please note: All new hires and first-time Identity Pass users will not have verified Id on the Authenticator app yet, so please click 'No'."
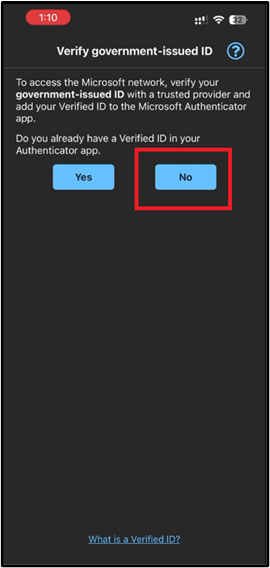
Step 7: Click "Start verification" and keep your ID ready.

Step 8: Click "Let's Begin" to start the verification process.

Step 9: Enter your personal email address (not your Microsoft account).
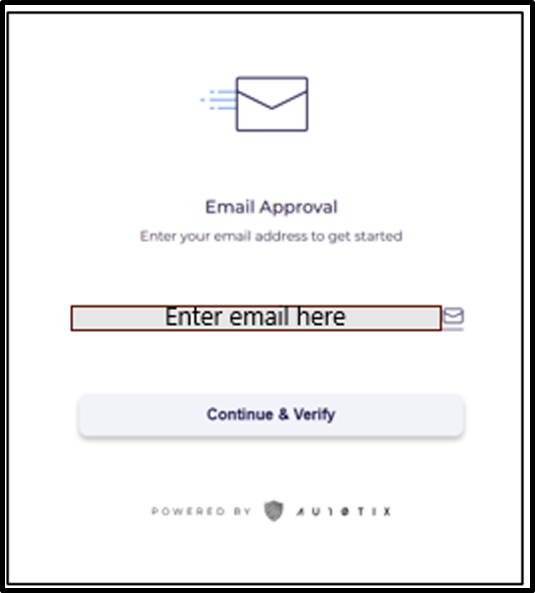
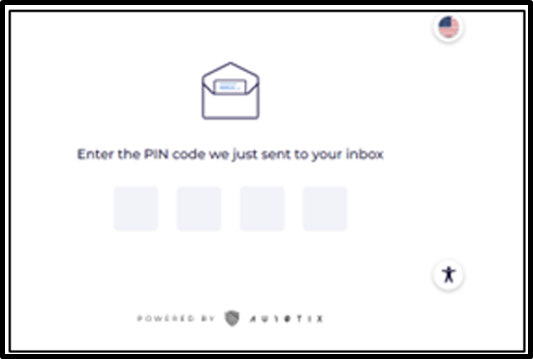
Step 10: Check your email for the verification mail and enter the PIN code.
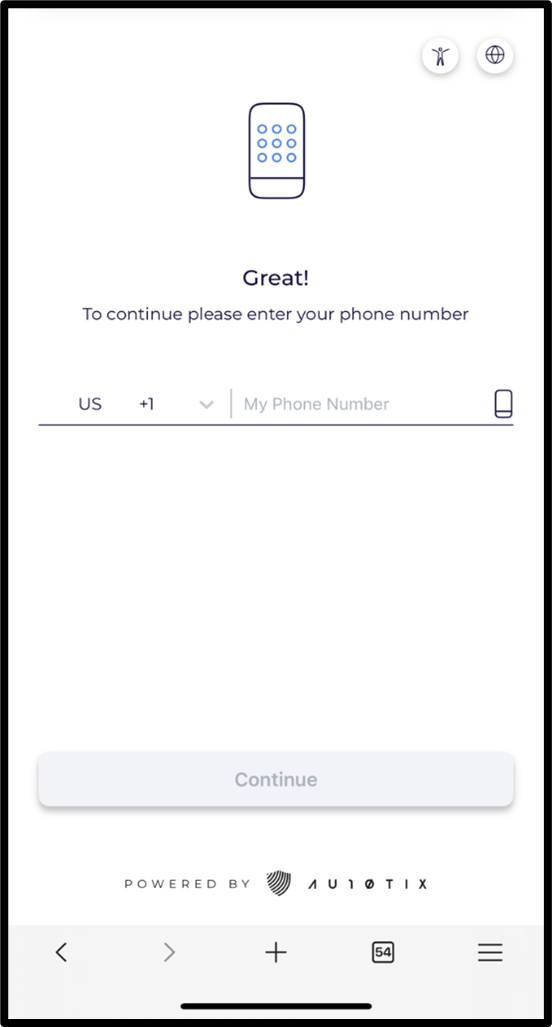
Step 11: Enter your mobile number and click "Continue"
Step 12: Have a valid government-issued photo ID ready (e.g., Passport, Driver's License) or any other government-issued legal photo ID

Step 13: Click "Continue" to Allow camera access and capture your document.

Step 14: Click "Allow" to proceed further

Step 15: Review and Accept Terms & Conditions.
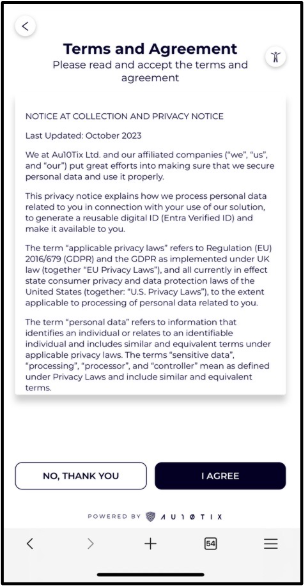
Step 16: Select Continue to capture the photo.

Step 17: Try to capture the legal document within the provided frame and verify the image before proceeding. Retake the photo if needed.

Step 18: Take a selfie for liveness detection. Remove glasses and masks, ensure good lighting.

Step 19: After verification, click "open the Authenticator app" to receive your Verified ID.

Step 20: You can view the VC on your Authenticator app, as shown in the image below.

Step 21: Return to the Identity Pass app and click "I have my Verified ID."

Step 22: Prepare for the liveness detection prompt and follow the instructions provided. Make sure you are in a well-lit room and remove any obstructions from your face (e.g., masks or sunglasses).
Note: If you receive an error message like this: 'Request denied. Your identity cannot be verified. Reach out to your Microsoft contact to have your badge picture updated'. → Reach out to your manager/reviewer to resolve this issue.

Step 23: Complete the face check.

Step 24: Click "Present Verified ID" to share your Verified ID with Identity Pass.

Step 25: Wait for the incoming video call from your reviewer (within 24 hours). Join via push notification, Teams, or email.

Step 26: Wait for the incoming video call from your reviewer. They have up to 24 hours to initiate the video call with you. This may happen shortly after you submit depending on the reviewer's availability. You will receive a push notification on your phone (please ensure that push notifications are allowed in the Identity Pass application settings), a Microsoft Team notification, and an email notification to join the call with an approver.
Step 27: Select the link in one of the above-mentioned notifications to Join the video call with the reviewer. To successfully complete the verification process, you must stay on the video call with your manager for at least 15 seconds and answer the reviewer's identity verification questions. Once the call is complete, wait for the reviewer's decision.
Step 28: When your request is verified, you will receive a notification to retrieve a Temporary Access Pass (TAP) in the Identity Pass app. This TAP is only valid for 30 minutes.
Important Note:
After successful verification and approval, you'll receive a Verified ID in the Identity Pass app to streamline future requests. If you don't complete onboarding within 30 minutes or lose access within 30 days, you can easily request a new Temporary Access Pass (TAP) by completing liveness detection, skipping the need for another video call if the previous verification was completed within that 30-day timeframe.
Step 29: Use the TAP code to set up your MFA in the Authenticator app by clicking "Set up my passkey" and follow the instruction in "PRMFA Setup".


 1.
1.